What is WordPress?
Funny you should ask! I was just about to tell you…. ok..ok I know some of you know what it is but as a review:
The following was taken from utopian.net. No sense reinventing the wheel here… this is an excellent summary:
WordPress – what it is
WordPress is an [excellent] tool for managing content. If you need to add a page to your site, write a new post about the latest news, upload new photos, or update an ever-changing event calendar, WordPress is a solid and simple way to do all the above, without fiddling with code, and with a variety of ways to organize and present your content built-in.
If you’re completely new to WordPress, the place to start is the WordPress crew’s First Steps with WordPress. Below, you’ll find introductions and links to detailed documentation for major tasks in managing your site.
Admin Panel – manage site
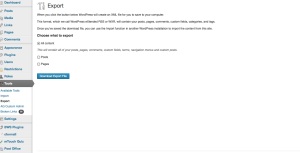
The admin panel controls your site and your blog, giving you point-and-click access to every WordPress feature: change the appearance of your pages, configure plugin features, and, most importantly, easily write and upload text and pictures. Your site’s admin panel is available at your URL, followed by /wp-admin/.
CLICK IMAGES TO ENLARGE
[two_third] [/two_third] [two_third_last][/two_third_last]
The WordPress team and community have provided extensive documentation for the base WordPress admin panel. It’s one of the first places to look if you’re fairly new to the blogging process, or to managing your site with a content management tool like WordPress.
Themes – control site appearance
You can find lots of looks for your WordPress-based site by visiting the official theme repository at the WordPress project, and at several other places around the net. Try a Google search for WordPress themes to get an idea of the choices, which range from free themes you can download and use or modify, to services that provide theme design and/or integration. CAUTION BASED ON RECENT EVENTS SURROUNDING VULNERABILITIES WITHIN WORDPRESS, DRUPAL, ET AL, BEST TO KEEP WITH THOSE THEMES AND PLUG-INS FOUND SPONSORED ON WORDPRESS SITE.
To use a new theme, first download it from the WordPress theme site. Themes are usually packaged as a .zip file. When the download completes, open the zip file to expand its contents. This will typically result in a folder with the same name as the theme file you downloaded. Click on the admin panel under Appearance, then Themes (Click pic to enlarge):
[two_third] [/two_third]
[two_third_last][/two_third_last]
Once it’s uploaded, you should be able to ADMINISTER the theme in the admin panel under Design | Themes and immediately see the new look on your site.
WordPress is not a web design tool. Switching from one existing theme to another and back again is one-click easy. However, creating and modifying themes is more involved, and WordPress is equipped with only very basic tools for theme editing. For now, it’s best not to mess with customization unless you are willing to spend time administering the site on a regular basis.
Plugins – add site features
The process for adding WordPress plugins is similar to that described above for installing a new theme, and new plugins can be uploaded directly inside the admin panel:
[two_third] [/two_third][two_third_last][/two_third_last]
Selecting ‘Add New’ in this panel will take you to the WordPress Plug In Picker Page:
[two_third] [/two_third][two_third_last][/two_third_last]
The WordPress project’s official plugin repository has hundreds of useful community-developed plugins available to extend and customize WordPress. Common plugins provide search engine optimization, integration with popular social networking sites like flickr, facebook, twitter, and others, and tools for things like podcasting, or showing your instant messaging presence. There is a wide selection.
Click the plus sign below for more information:
Spoiler title
There is not an abundance of primers’ out there. The following is pretty good introduction. We will follow with a few steps for you to follow to get you started.
A pretty good start
Additional Definitions
- Admin Panel/Dashboard – As explained above, this is the area that controls operation look and feel and navigation of the site. You need to spend some time in this area to learn about all the functions of WordPress. WordPress has its own look and feel but essentially it is the same concept.
- Settings – This is the control menu for most all the plug-ins as well as reading and writing controls for the entire site.
- Pages versus Posts – Take a look at the link to determine the difference between them. In most regards they are the same. While Pages are higher in the ‘food chain’ hierarchy than posts, they do look similar. Under posts you have categories and tags. You can cause the posts to appear as static pages or show a chronology like what a blog would do.
- Media Uploads – This is the area where you upload (and allow users to upload media (video, audio, pictures, etc.) to your site. You can use the area too, like I have to show you screen shots. Or you can send the images to a completely different place and link to them. I personally like to do this for security reasons and back-up.
- Users/Roles – This gives functionality to the site, based on the level and type of users you have. There are a few plug ins for this.. Role Scoper being the most extensive and most popular.
- Plug Ins – We’ve already discussed. There are thousands available. Best to keep with those sponsored by WordPress because this is a source of vulnerability on your site. if you install a non-sponsored one you do so at your own risk.
- Themes – ditto
- Categories versus Tags – This allows you to allow sub context to your pages. it is categories that allows me to create sub sections for Lesson, Assignments, Calendar, and Syllabus on this site, for example.
Do This!

Here is a step by step set of instructions for you to follow to get your site up and running. You need to complete the activity, get the site up and running and then send a link to it in the drop box set up on Canvas. The instructions for setting up WordPress and for Drupal are almost the same. I am not specifying which program you do first. For the final activity you will select one, followed by a short reflection comparing the two and reasons why you selected the one you did.
Click the Plus sign below for more information on how to run WordPress on your computer
Spoiler title
You may wish to run WordPress on your computer prior to loading it up to your IP. Here are the instructions.
Running WordPress on Your Computer
There is a way to run Drupal and/or WordPress on your own desktop/laptop. But because php and mysql assume a client-server relationship, you must first install on to your computer a ‘server simulation program’ (called Xamp.. Mac’s also have their own simulator called Mamp, but the latest MACs will run either simulator). Both Drupal and Worpdress can then be installed locally. This way, you can do all your design and production work locally and not have to contract with an external ISP just to try the products out. This is especially useful in this course where you will be trying the both out then picking one of them for your final project. Note that you do not HAVE to do it this way, but is being offered as an alternative.
This concept is especially useful if you happen to live in an area with poor Internet service and want do not want all the delays. You would have to download the plugins and themes using the Internet but all the design work can be done without an Internet connection. Then, once you are satisfied, you can easily recreate your final product by uploading it to your IPS of choice. I find this especially useful when I set up at conferences, for example, and want to be able to show my sites but do not have any Internet service.
I have provided you with a tutorial on how to set this server simulation up on your computer. I have also provided a step by step set of instructions on how to upload a duplicate of your final version on to the ISP.
[/accordion]
Here are the steps to set up your CMS on your Web Host
- Contract with a hosting service that is WordPress AND Drupal friendly/compatible. We are not asking you to spend a lot of money here. Most of the free hosting sites are laden with ads… and many do not support php5, mysql, Drupal, or WordPress. One of the better ones (and most reasonable) is hostgator. Hostgator offers a one-click install for Drupal and what they refer to as a quick install for WordPress.Dreamhost is a little more expensive and they offer a One Click install for WordPress and Joomla! (but not Drupal).
- To do your WordPress install, use this 5 Minute install (if you chose Dreamhost, there is a one-click install under the Goodies heading in the control panel. Be sure to choose ‘custom’ or they will automatically install hundreds of them alternatives that you will have to pour through to get to the one you want).
- Unless you wish to pay for two site hostings/domains, be sure NOT to set up WordPress in the root directory. Call the directory anything you wish but make it distinctive. Drupal and WordPress can co-exist on the same site as long as they are in their own directories. Then when you refer to the WordPress site you would give the link http://mysite.com/wordpress/ (or something similar to distinguish it).
- You MAY wish to select the default theme. You can experiment on your own by searching the themes offered on the WordPress site.
- You can also search for plugins in the dashboard. Select at least four and install them. If you have already done the Drupal activity, see if you can find modules that replicate (or closely replicate) what you chose on Drupal.
- Begin working on your site (or blog). The context may be of your choosing. As this is an education/training course, most will probably pick one for that industry. However, some of you come from higher education and or a business and may wish to create one for your own interest. The idea is to make it functional and of good design. If you have to spend some time on this, why not make something tat you can actually use? We will be looking at each product during our final Adobe Connect session at the end of this term.
- If you chose to start with Drupal, the idea here is to replicate in Drupal the essence of the site you have already created (including trying to identify similar plug ins that do similar things as the add-on modules did for Drupal. This will allow you to see the differences between the two CMS systems and make your choice as to the best one that suit your needs.
- If you have issues or would like some type of formative review, you can contact your instructor.
- Be sure to post a link to your site in the drop box set up on Canvas by the deadline. If you have decided to install Wordspress on your local computer, then simply upload a few screen shots of your practice site into the dropbox set up in Canvas


