After Completing this Lesson You are Expected to Do the two Activities
Sound moves in a spherical three-dimensional pattern away from its source at 1130 ft per/sec in the form of a wave. It has peaks (highs) and troughs (lows) that build or cancel one another to create complex wave forms... (some of which) are audible to us.
Audio (or is it 'sound??') is an important component for any multimedia project. Audio can enhance or detract from your student’s enjoyment/understanding of the product. As an experiment, try watching a TV show or a movie for a while without audio. You will notice things visually that you may have missed previously. On the other hand you may not understand what is going on.. especially if you cannot read lips.
In this course, we want to consider ways that audio is useful and apply it appropriately. That is not always easy and you need to have some basic audio editing skills to accomplish this. Most often audio is left to the last moment in a project or forgotten altogether. In honor of this normal oversight, we are starting with audio. A good video is made better with proper voice overs that are ‘normalized’ (i.e., presented at the correct and appropriate amplitude/volume).
There are two kinds of audio in a video… diagetic and non-diagetic. These are very fancy words. The former simply refers to those sounds in nature (i.e., ambient sounds). The latter to those that are artificially added afterward in post production (voice overs, special effects, etc.) These can be done while shooting a video but most often non-diagetic sounds are added later. In some cases, you might wish to remove the ambient/diagetic sounds altogether. Then there is the issue of balancing the two.. Sometimes you need for music to die down as you begin to do your voice over. You must pay attention to this during production because once your project is rendered (i.e., finalized ) it is almost impossible to fix this interaction between the two types of audio in your final project. When we get to our video lesson we will show you some tricks on how to insert both ambient sounds and non-diagetic sounds and balance the two. First, we need to work with audio on its own to become familiar with how to edit it correctly. We start with microphones....
What are Transducers?
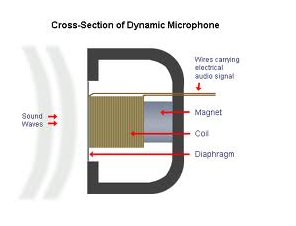
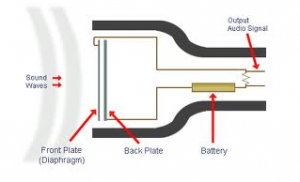
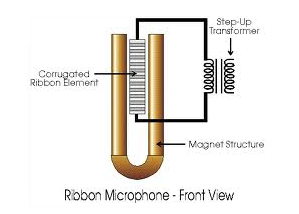
Transducers are used in microphones and speakers to convert one type of energy (electric) into another (sound). Microphones and speakers are electro-acoustic transducers that convert sound into an electrical signal, and electrical signal back into into sound. In other words, speakers are just microphones in reverse.
The three most common types of transducers used in audio recording are:
1. Dynamic
[one_third].[/one_third][one_third]
2. Condenser
[one_third].[/one_third][one_third]
3. Ribbon
[one_third].[/one_third][one_third]
Microphone graphics courtesy of http://churmura.com/
*Source: http://hammersound.net
Ok we have done our bit to cover analog sound/audio and microphones. Now lets take a look at digitized sound. Before we do, we need to talk a bit about the elements that make up sound and our abilities to actually hear it.
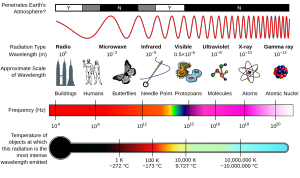
Scientists assume that the human ear is able to discern frequencies between 20Hz-20000Hz, since those numbers make their calculations a lot easier.
Here are a few examples of different frequencies:
| 60 Hz | 440 Hz | 4000Hz | 13000Hz | 20000Hz |
| -very- low | A' | audible | ouch! | too high |
Another very important property of sound is its level; most people call it volume. It is measured in dB (=deciBell, named after Alexander Graham Bell, the inventor of the telephone).
So why don't we measure loudness in Bell instead of deciBell? Mainly because your ear really can discern an incredible amount (1.200.000.000.000, that's 11 zeroes) of different loudness levels, so they had to think of a trick to describe an incredible range with only a few numbers. They agreed to use 10th's of Bells, deciBells, dB, instead of Bells.
Most professional audio equipment uses a VU meter (=Volume Unit meter) which shows you the input or output level of your equipment. This is very convenient, but only if you know how to use it: A general rule is to set up the input and output levels of your equipment so that the loudest part of the piece you want to record/play approaches the 0dB lights. It is important to stay on the lower side of 0dB, because if you don't, your sound will be distorted badly and there's no way to restore that. If you're recording to (analog!) tape, instead of (digital) hard disk, you can increase the levels a bit, there is enough so-called 'headroom' (=ability to amplify a little more without distortion) to push the VU-meters to +6dB. There is some more information on calibrating equipment levels in the recording section below.
Some examples of different levels, if you'd like to play with them for a while:
| 0,0dB = 100% | -6,0dB = 50,0% | -18,0dB = 12,5% | +6,0dB = 200% |
| maximum level | half power | very quiet | a little too loud-a lot of distortion |
When digitally recording your audio there are two main settings that define the quality of the audio waveform:
- Bit Depth is the amount of electronic voltages used to describe the depth of the audio. Directly related to the amount of dynamic range.
- A Sample Rate is the number of 'snapshots'/samples of the audio taken over a given period of time. Higher rates equate to smoothness in the audio, which in turn affects the amount of lows to highs that we hear.
- Standard Redbook CD settings for bit depth and sample rate are 16bit (a sample rate of 44.1khz). DVD's are usually measured as 24 bit (a sample rate of 48khz — 192khz).
Why is this important? When you do your audio projects you will have the opportunity to set the levels in order to make the sound play well based on your computer quality. This is also the way one can control 'normalization' .. a means to make sure all audio plays back at a consistent level among different parts of a movie or different movies.. ever notice when you watch a TV show and all of a sudden the commercial BLASTS at you? While this is intentional, you could normalize everything so you would not have to constantly adjust the volume on your set as you watch things.
Sampling
The sample rate of a piece of digital audio is defined as 'the number of samples recorded per second'. Sample rates are measured in sampling units of frequency called Hertz (Hz, or kHz ... kiloHertz, a thousand samples per second) (named after Heinrich Rudolf Hertz, the first person to provide conclusive proof of the existence of electromagnetic waves). The most common sample rates used in multimedia applications are:
| 8000 Hz | 11025 Hz | 22050 Hz | 32000 Hz | 44100 Hz | 48000 Hz |
| really yucky | not much better | only use it if you have to | only a couple of old samplers | Perfect!! | some audio cards, DAT recorders |
How Much Sampling is Enough?
Nyquist Theorem states that the sampling frequency must be at least twice the frequency range. So if human hearing is in the 20hz — 20khz range, at the very least 44.1khz is the minimum sampling rate... Higher sample rates are used to describe the more emotional frequencies, (i.e., 'harmonics') that we perceive but are outside of our audible range.
Dynamic range
The capacity of digital audio cards is measured in bits, e.g. 8-bit sound cards, 16-bit sound cards. The number of bits a sound cards can manage tells you something about how accurately it can record sound: it tells you how many differences it can detect. Each extra bit on a sound cards gives you another 6dB of accurately represented sound (Why? Well, Because. It's just a way of nature). This means 8-bit sound cards have a dynamic range(=difference between the softest possible signal and the loudest possible signal) of 8x6dB=48dB. Not a lot, since people can hear up to 120dB. So, people invented 16-bit audio, which gives us 16x6dB=96dB. That's still not 120dB, but as you know, CD's sound really good, compared to tapes. Some freaks, that's including myself ;-) want to be able to make full use of the ear's potentials by spending money on sound cards with 18-bit, 20-bit, or even 24-bit or 32-bit ADC's (Analog to Digital Converters, the gadgets that create the actual sample) which gives them dynamic ranges of 108dB, 120dB, or even 144dB or 192dB.
Unfortunately, all of the dynamic ranges mentioned are strictly theoretical maximum levels. There's absolutely no way in the world you'll get 96 dB out of a standard 16-bit multimedia sound card. Most professional audio card manufacturers are quite proud of a dynamic range over 90 dB on a 16 bit audio card. This is partly because of the fact that it's not that easy to put a lot of electronic components on a small area without a lot of different physical laws trying to get attention. Induction, conduction or even bad connections or (very likely) cheap components simply aren't very friendly to the dynamic range and overall quality of a sound card.
Quantization Noise
Back in the old days, when the first digital piano's were put on the market, (most of us didn't even live yet) nobody really wanted them. Why not? Such a cool and modern instrument, and you could even choose a different piano sound!
The problem with those things was that they weren't as sophisticated as today's digital music equipment. Mainly because they didn't feature as many bits (and so they weren't even half as dynamic as the real thing) but also because they had a very clearly rough edge at the end of the samples.
Imagine a piano sample like the one you see here. It slowly fades out until you here nothing.
At least, that's what you'll want... As you can see by looking at the two separate images, that's not at all what you get... These images both are extreme close-ups of the same area of the original piano sample. The highest image could be the soft end of a piano tone. The lowest image however looks more like morse code than a piano sample! the sample has been converted to 8 bit, which leaves only 256 levels instead of the original 65536. The result is devastating.
Imagine playing the digital piano in a very soft and subtle way, what would you get? some futuristic composition for square waves! This froth is called quantization noise, because it is noise that is generated by (bad) quantization.
There is a way to prevent this from happening, though. While sampling the piano, the sound card can add a little noise to the signal (about 3-6 dB, that's literally a bit of noise) which will help the signal to become a little louder. That way, it might just be big enough to get a little more realistic variation instead of a square wave. The funny part is that you won't hear the noise, because it's so soft and it doesn't change as much as the recorded signal, so your ears automatically forget it. This technique is called dithering. It is also used in some graphics programs e.g. for re-sizing an image.
Digging Deeper -The Digitization Process
For those of you who wish to dig a little deeper into the theory behind digital audio, you can watch this short videocast (runs approx 25 minutes). It is a shortened form of a 3 hr lecture that I used to introduce digital audio concepts to a digital media class.
Commonly Used Audio Codecs / File Types
- mp3 is probably the most well-known audio format for consumer audio storage. While it is emerging as the 'de-facto' standard of digital audio compression for the transfer and playback of music on digital audio players, there still remain several licensing issues associated with this format.
Because of these licensing issues, many developers have come to issue their own proprietary formats. THIS EXPLAINS WHY WE often HAVE TO ADD A PLUG IN TO the editors in order to be able to convert a .wav file to .mp3 (WHICH IS A LICENSED FILE TYPE):
- WAVe standard is the audio file container format used mainly in Windows PCs. It is commonly used for storing uncompressed (PCM), CD-quality sound files, which means that they can be large in size —around 10 MB per minute. WAVe files can also contain data encoded with a variety of (lossy -- i.e., there is some data/quality loss) codecs to reduce the file size.
- AIFF is the standard audio file format used by Apple. It could be considered the Apple equivalent of wav.
- FLAC file format is a Free Lossless Audio Codec, a lossless compression codec, theoretically speaking, offers no data loss, which results in larger file sizes.
Audio Conversion
It is important to have some audio conversion software in your toolkit (to include the ability of a video editor that is able to handle only the sound) so you can tailor your audio file to your particular application. Most common file format for podcasts etc is .mp3. Many of the audio production programs create formats particular to their own platform, etc. (like .wav (PC) and .aiff (MAC) files). So, you will be faced with having to convert your files to another format.
If your video editor does not handle mp3 conversions I have listed below are some audio only programs to look into and some information on how to use your basic media players to convert your audio. Here are two commonly used (and free) ones:
- Switch (universal)
- Online-Convert is a free online converter (pretty good)
- Zamar is another Online file conversion site that provides free conversions for multiple file types
iTunes generally uses .aiff files How to convert iTunes files
